Deleting stale branches in Azure DevOps Git Repositories with Azure Logic Apps
Stale Branch… Huh?
Azure DevOps, GitHub, etc. refer to a branch as being “stale” when it has no new commits within a certain number of days. I believe Azure uses 90 days as its reference. Pretty simple really! Unfortunately Azure DevOps doesn’t automatically delete/archive stale branches. In this article I’m going to describe a solution to that problem.
Why delete your stale branches?
Again, it’s pretty simple really. Having multiple branches of the same code base at different states or moments in time will likely cause confusion (and potentially problems!). If a branch has been released it should be merged to the master branch, if it’s unreleased it “could” be discarded. If you want the ability to restore the branch at any point you can simply tag the most recent commit! Git’s garbage collector prunes “unreachable” commits (essentially those not part of a branch or tags “tree”).
My Solution
So, I wanted to automate the process of deleting stale branches and make it a team activity. To achieve this I wanted the following key points in the process:
- To check all repositories within the project
- To ignore the
masterandmainbranch - An approval process
As with most challenges I opened up google and had a look what I could see… mmmm plenty of options… but being a dev at heart and wanting to know how it works, so I set about crafting my own solution.
I started to look at what I could do with Azure Pipelines and the Azure CLI, but decided against that as I felt the approval process would be a little clunky. Next port of call was Logic Apps and Power Automate, and this is where I stayed.
Fortunately Azure Logic Apps has a connector that provides an action to list all repositories within an Azure DevOps project, unfortunately that is where the specific actions stop and you have to use the HTTP request action to query the api from then on to get the branch information.
In summary the solution contains the following:
- A parent logic app…
- that executes on a schedule (once every week)
- iterates refs (branches) with all the repositories with my project
- ignores any ref named master or main
- determines if the branch is stale
- call a child logic app that manages the approval and delete
- A child logic app…
- sends an approval request to a teams channel
- if approved, deletes the ref (branch)
Note: If you’re not familiar with logic apps, I would suggest you read the following tutorial before continuing with this article.
Child Logic App
Create a new logic app
We need a child logic app to handle the approval process and delete of stale branches. We are doing this in a child logic app so we can introduce an asynchronous pattern to our flow and not have the main process wait for each approval in sequence.
Create a new logic app, give it a suitable name and select When a HTTP request is received trigger.
Configure the trigger
- Set the triggers Request Body JSON Schema with the following:
1 | { |
- Set the Method to
POST
Respond and get branch stats
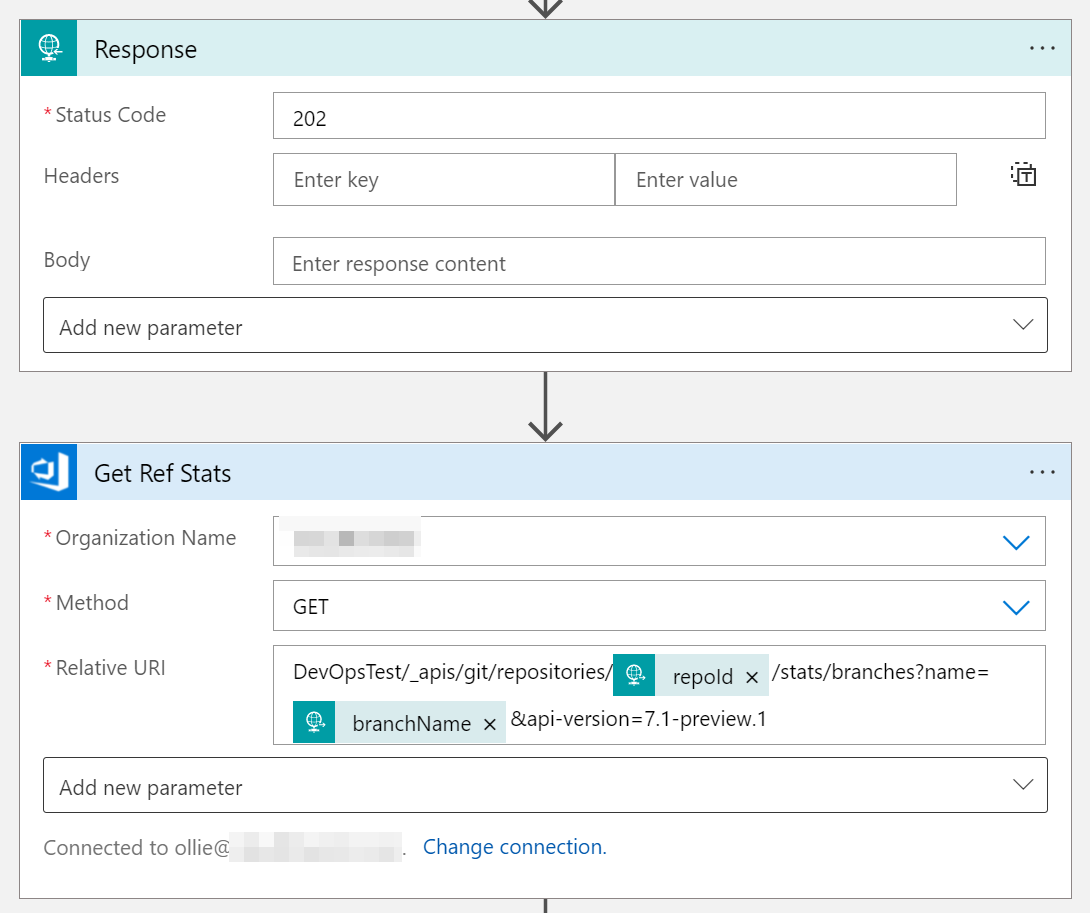
- Add a Response action and set the Status Code to
202(Accepted). - Add a Send an HTTP request to Azure DevOps action and configure as follows:
a. Set the organization as required
b. Set the method to GET
c. Set the retieve uri to{project}/_apis/git/repositories/@{triggerBody()?['repoId']}/stats/branches?name=@{triggerBody()?['branchName']}&api-version=7.1-preview.1, replace{project}with the name of your Azure DevOps project.
Parse the branch stats response
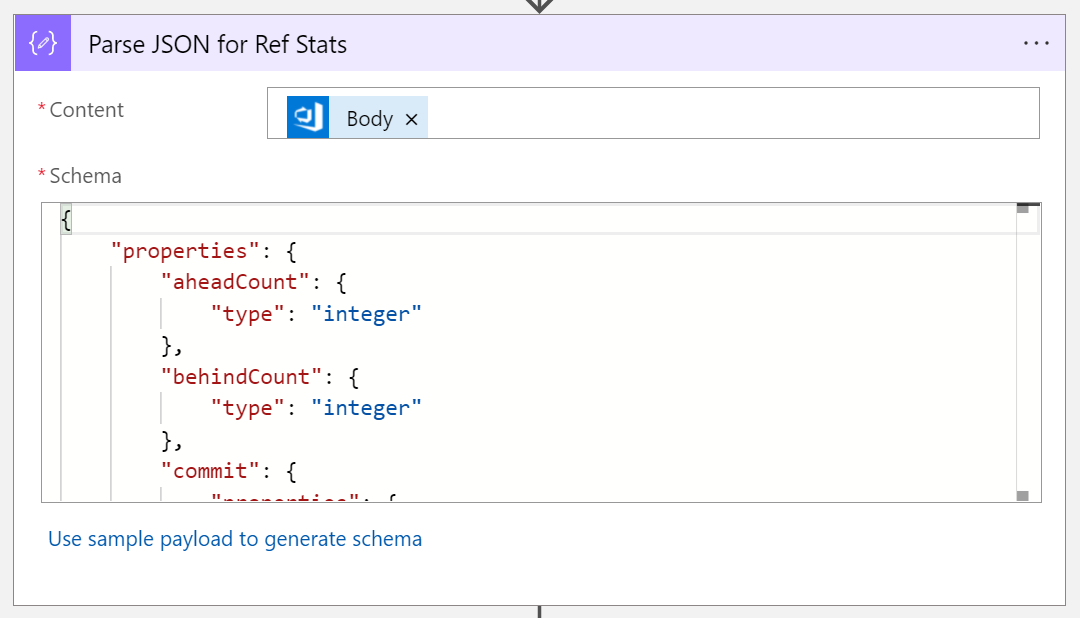
- Add a Parse JSON action, set the Content to the body of the Send an HTTP request to Azure DevOps action response (e.g.
@body('Get_Ref_Stats')), and the Schema to the below:
1 | { |
Post adaptive card to teams channel
This step might need a bit of blurb to help explain it… I’m using an adaptive card to get a response from a user via MS Teams. You could do the same via email, but I like the idea of posting this to a channel for my dev teams to action together, using the chat to discuss it when required.
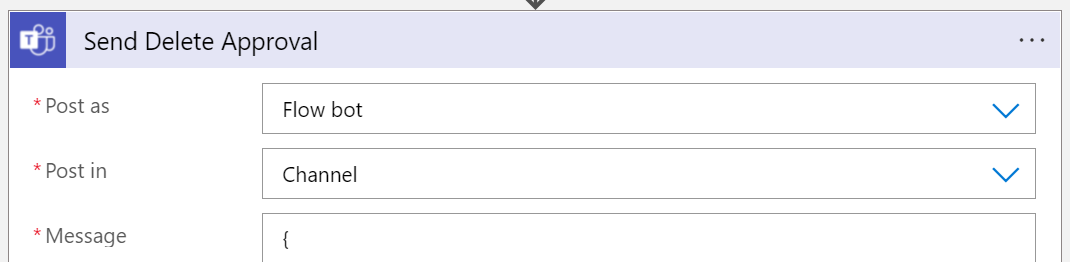
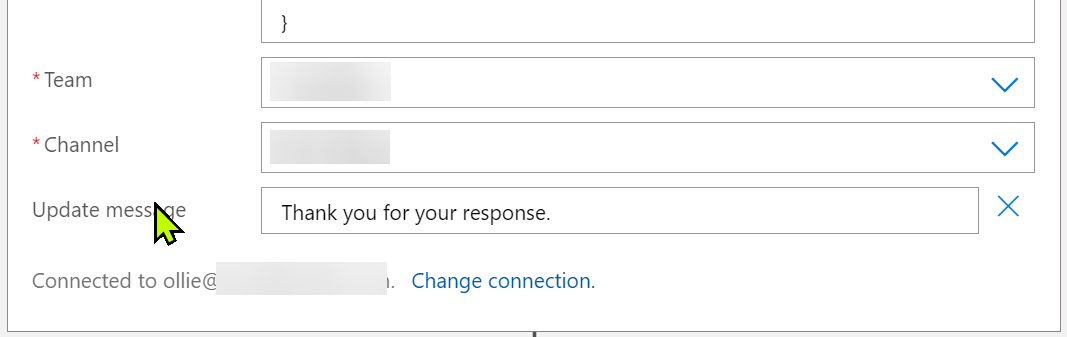
- Add a Post adaptive card and wait for a response action and configure as required for your MS Teams service. Set the message as below (making sure to configure the expressions correctly) or you could even use the adaptive card designer to design you own card
1 | { |
Check adaptive card response
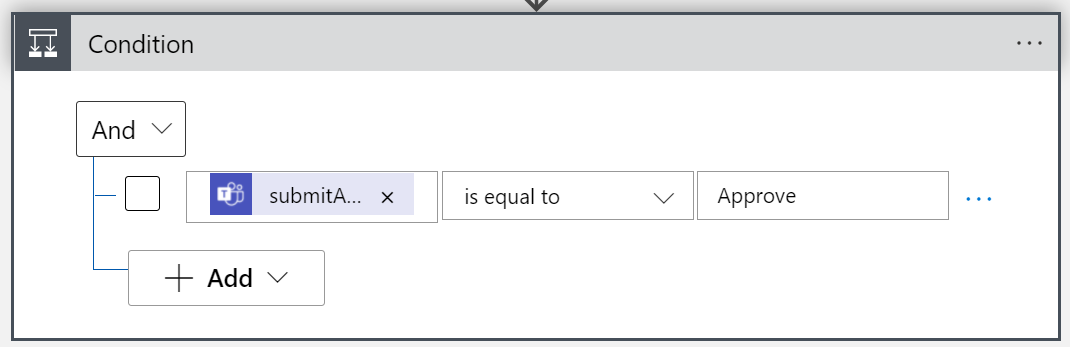
- Add a Condition action
- Set the condition
body('Send_Delete_Approval')?['submitActionId']is equal to “Approve”
When response is NOT “Approve”
Within the “False” branch of the condition:
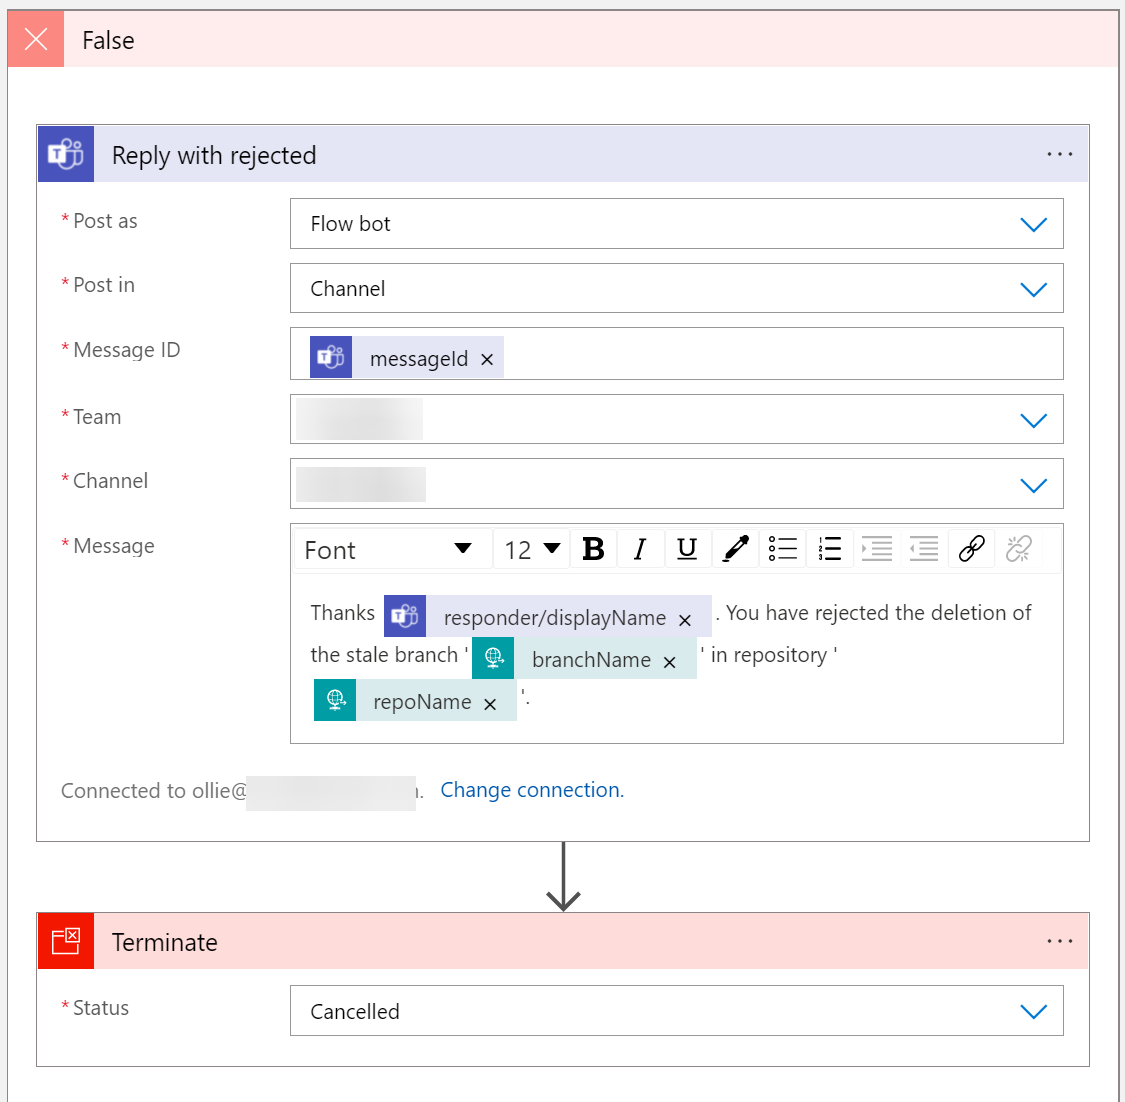
- Add a Reply with a message in a channel action and configure as required for your MS Teams service.
- Set the Message Id to the message id of the Post adaptive card and wait for a response action (e.g.
body('Send_Delete_Approval')?['messageId']). - Set the Message as desired (e.g.
Thanks @{body('Send_Delete_Approval')?['responder/displayName']}. You have rejected the deletion of the stale branch '@{triggerBody()?['branchName']}' in repository '@{triggerBody()?['repoName']}'.). - Add a Terminate action after the Reply with a message in a channel action. I have this set to Cancelled, but I’ll leave you to decide what status you’d prefer.
When response IS “Approve”
Within the “True” branch of the condition:
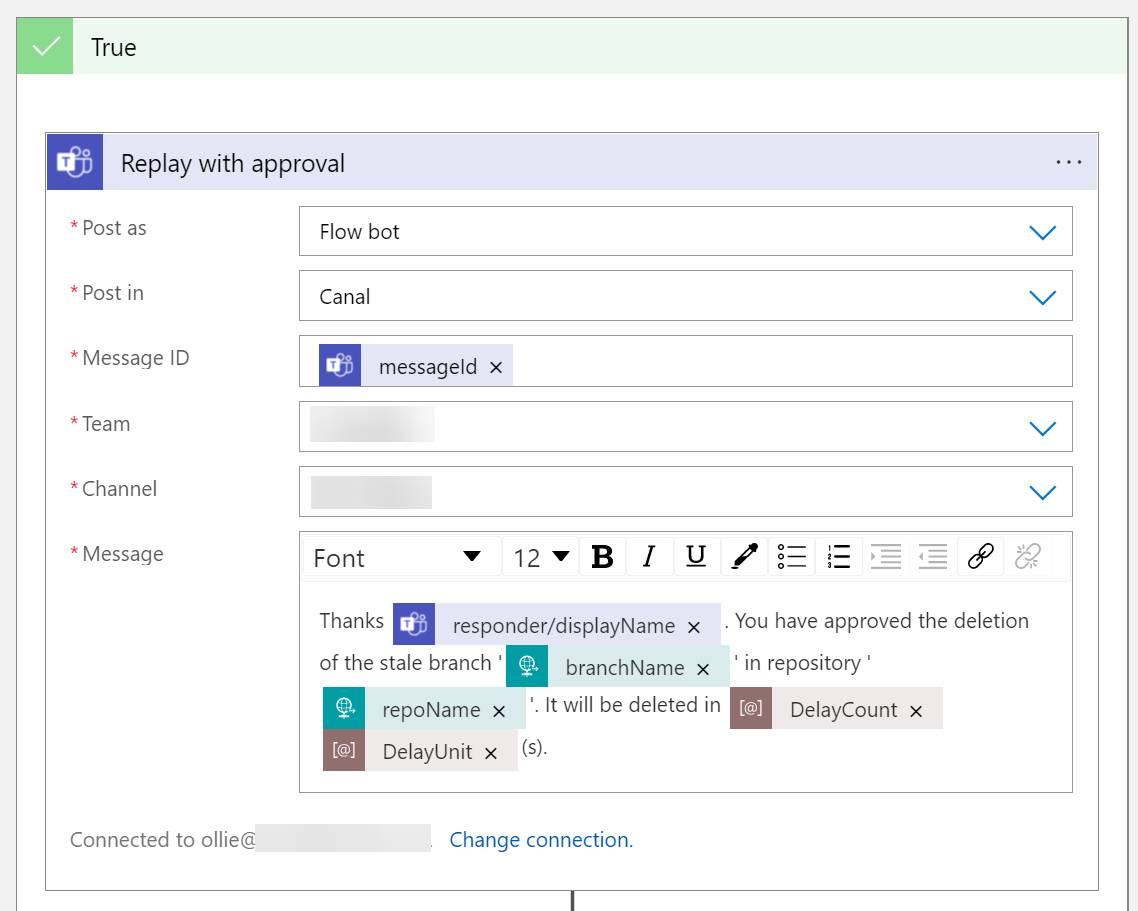
- Add a Reply with a message in a channel action and configure as required for your MS Teams service.
- Set the Message Id to the message id of the Post adaptive card and wait for a response action (e.g.
body('Send_Delete_Approval')?['messageId']). - Set the Message as desired (e.g.
Thanks @{body('Send_Delete_Approval')?['responder/displayName']}. You have approved the deletion of the stale branch '@{triggerBody()?['branchName']}' in repository '@{triggerBody()?['repoName']}'. It will be deleted in @{parameters('DelayCount')} @{parameters('DelayUnit')}(s).). I’ve used two logic app parameters here to store the delay and units of delay (days/hours/etc.).
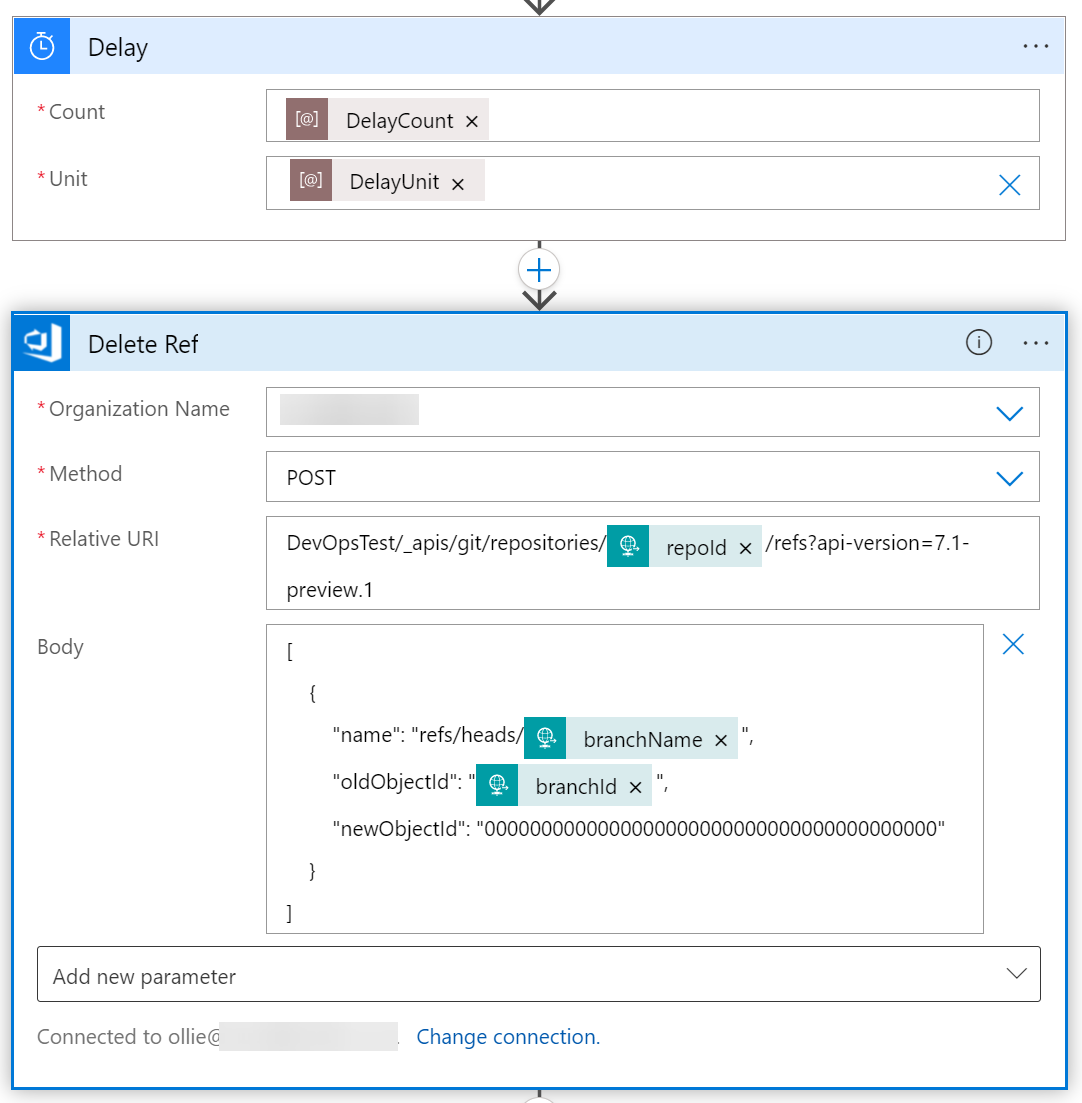
- Add a Delay action, and set the count and delay to the parameters used in step 3. This delay is to give dev teams the time to lock the branch if it decided that it need to be retained.
- Add a Send an HTTP request to Azure DevOps action and configure as follows:
a. Set the organization as required
b. Set the method to POST
c. Set the retieve uri to{project}/_apis/git/repositories/@{triggerBody()?['repoId']}/refs?api-version=7.1-preview.1, replace{project}with the name of your Azure DevOps project.
d. Set the body to:1
2
3
4
5
6
7[
{
"name": "refs/heads/@{triggerBody()?['branchName']}",
"oldObjectId": "@{triggerBody()?['branchId']}",
"newObjectId": "0000000000000000000000000000000000000000"
}
]
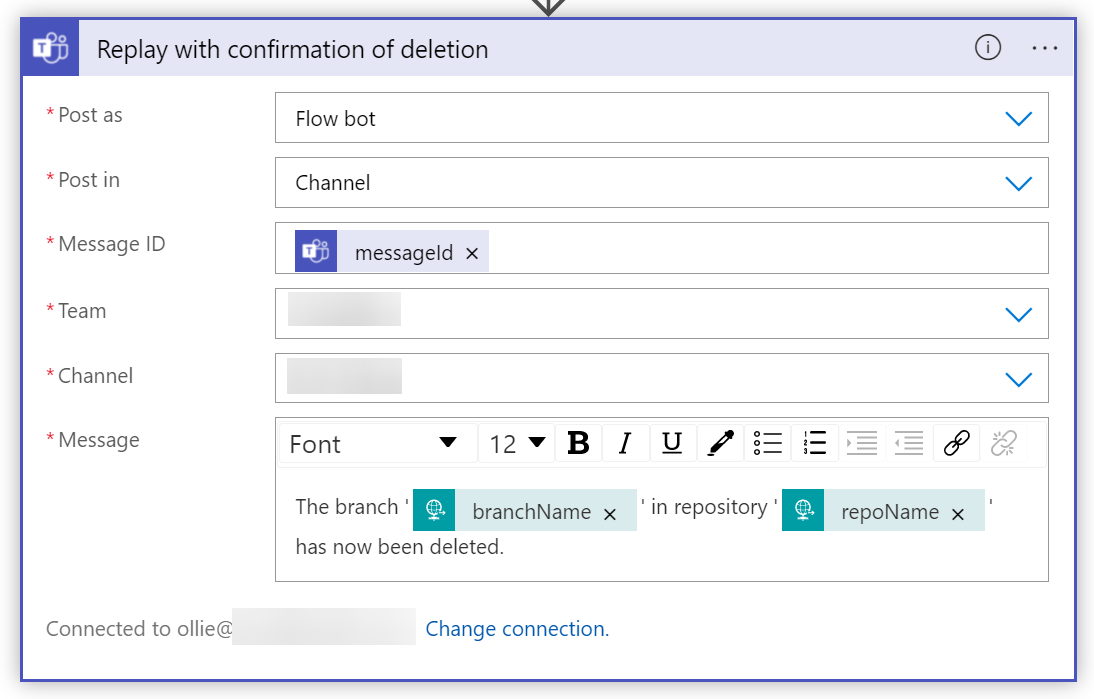
- Add a Reply with a message in a channel action and configure as required for your MS Teams service.
- Set the Message Id to the message id of the Post adaptive card and wait for a response action (e.g.
body('Send_Delete_Approval')?['messageId']). - Set the Message as desired (e.g.
The branch '@{triggerBody()?['branchName']}' in repository '@{triggerBody()?['repoName']}' has now been deleted.).
Parent Logic App
Create a new logic app
Now we can create the parent logic app using the blank logic app option (no template). Give it a suitable name and select the Recurrence trigger.
Trigger and iterate repositories
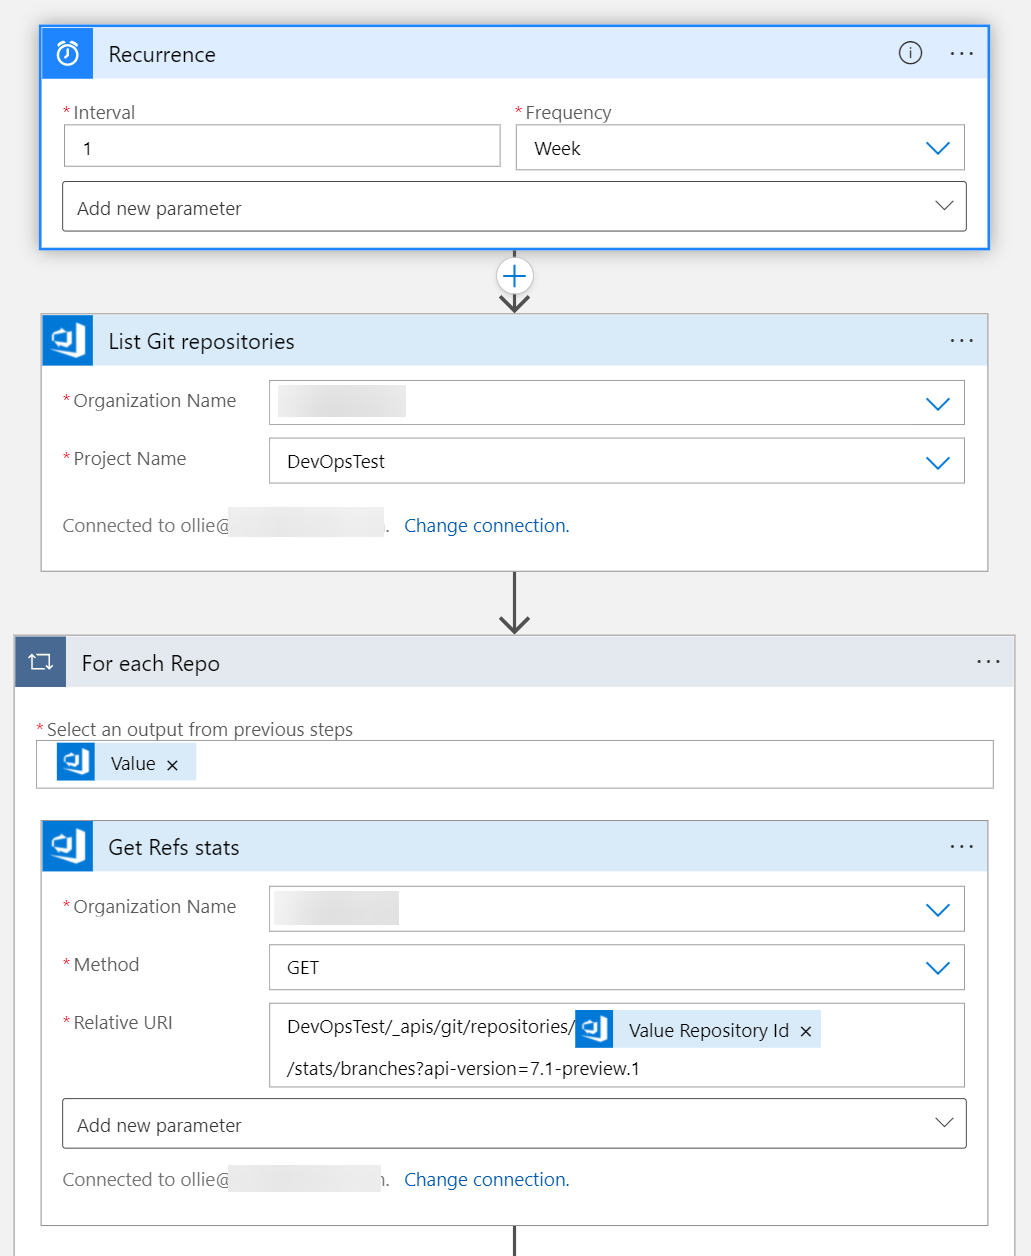
- Set the trigger interval and frequency as required.
- Add an Azure Devops List Git repositories action, sign in (setup the connection), then select the DevOps organization and project.
- Add a For Each action and select the value output from the List Git repositories action (e.g.
@body('List_Git_repositories')?['value']). - Add a Send an HTTP request to Azure DevOps action within the For Each action added in step 3. Configure as follows:
a. Set the organization as required
b. Set the method to GET
c. Set the retieve uri to{project}/_apis/git/repositories/@{items('{For_each_Repo}')?['id']}/stats/branches?api-version=7.1-preview.1, replace{project}with the name of you Azure DevOps project and{For_each_Repo}with the handle of the For Each action created in step 3 (Don’t forget the _ instead of a space).
Parse the branch stats response
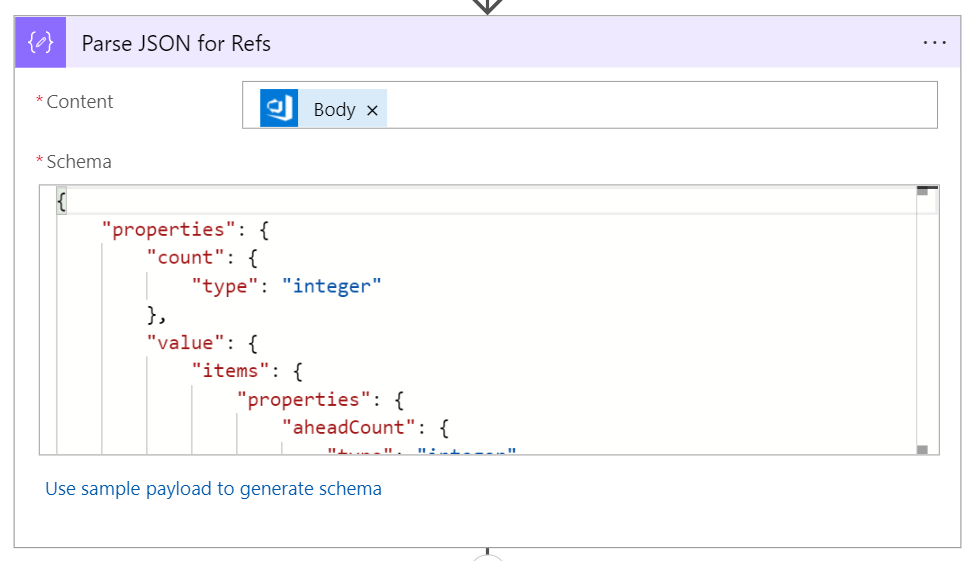
- Add a Parse JSON action after the Send an HTTP request to Azure DevOps action (still within the for each), set the content to the body of the Send an HTTP request to Azure DevOps action (e.g.
@{body('Get_Refs_stats')}) and set the schema (example below)
1 | { |
Validate each branch
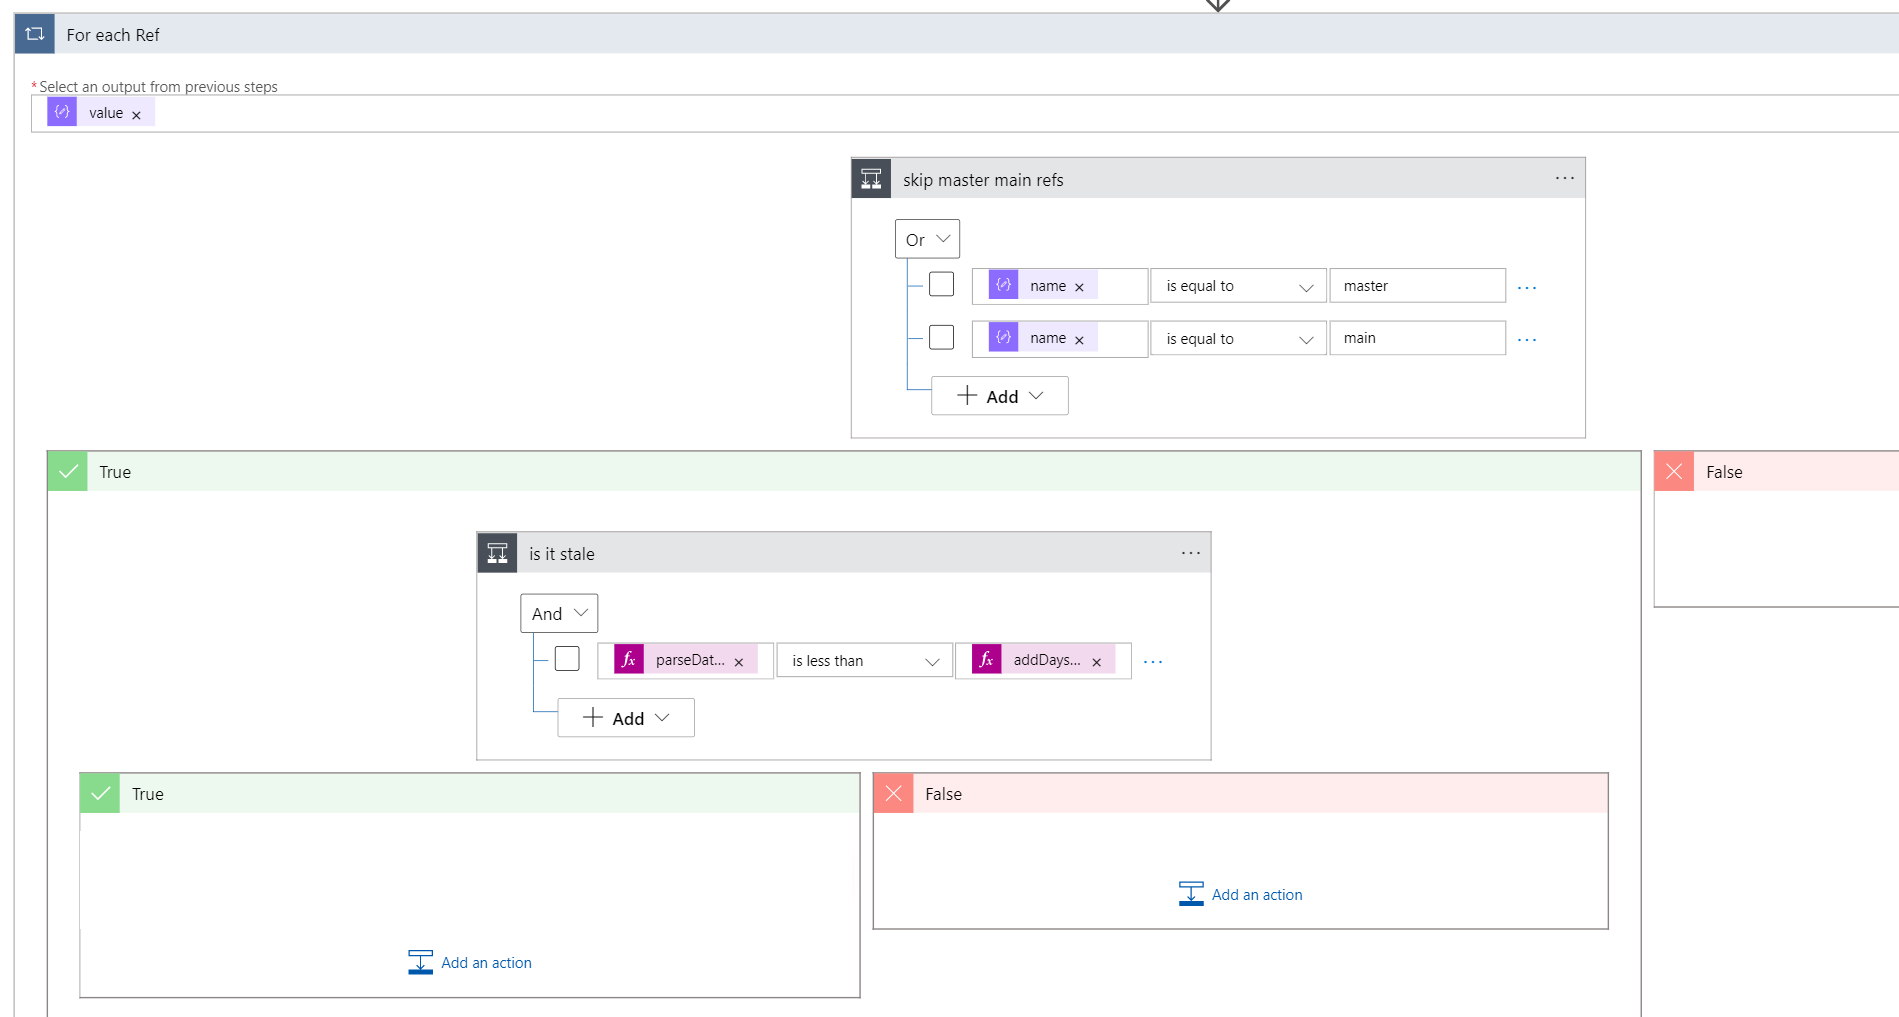
- Add a For Each action after the Parse JSON action added above. Set the input to the value (e.g.
body('Parse_JSON_for_Refs')?['value']) of the Parse JSON action added above. - Add a Condition action. Add two conditions to evaluate name (e.g.
items('For_each_Ref')?['name']), one to equal ‘master’ and one to equal ‘main’. Change the condition to a ‘Or’. - Add a Condition action to the success branch of the above Condition action. Add a condition to evaluate the commit author date (e.g.
parseDateTime(items('For_each_Ref')?['commit']?['committer']?['date'])) is less than today date minus 90 days (e.g.addDays(utcNow(),-90)). You can change the number of days to suit your needs.
Call the child logic app
Within the “True” branch of the above condition action:
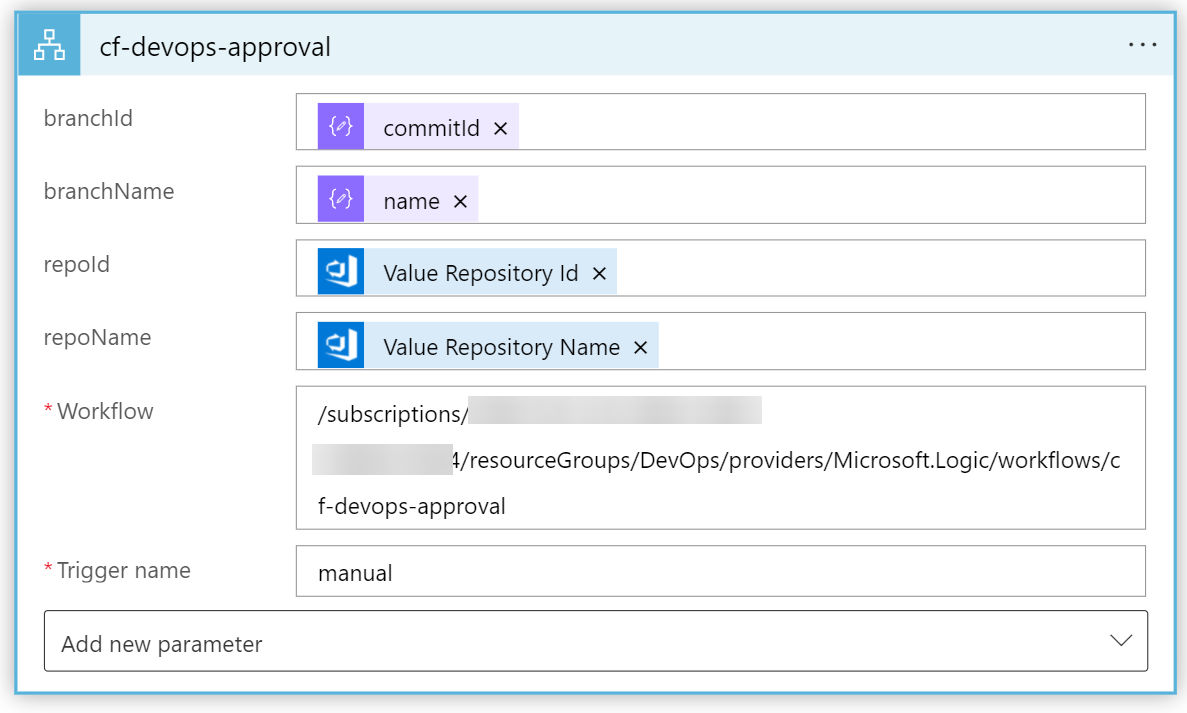
- Add a Logic Apps action and select the child app created above.
- Configure the child app:
a. branchId:@{items('For_each_Ref')?['commit']?['commitId']}
b. branchName:@{items('For_each_Ref')?['name']}
c. repoId:@{items('For_each_Repo')?['id']}
d. repoName@{items('For_each_Repo')?['name']}
note: Trigger Name and Workflow should be set automatically when adding the action.
The End
And that should be it! Your logic app should now run on your schedule and prompt your team to approve the deletion of a stale branch, helping you keep your Azure DevOps repositories tidy.
Have a nice day. Bye!